
Best Red Fish Flies
Red Fish Flies
The St. Simons Scampi is an original fly that builds upon the success of the Prawn’s Revenge. It is one of my killer red fish flies in the fall and winter or when the fish are keying on small shrimp. It can be used in both clear and murky water, and on most days this past winter it was my go to fly . It should also be great on the flooded grass flats in the summer. I can’t wait to try it there. Enjoy tying and fishing this very effective fly.
These are more red fish flies that catch fish in the Marshes of Glynn:
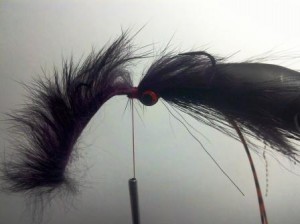
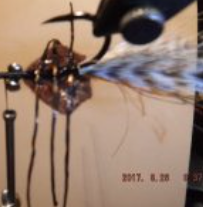
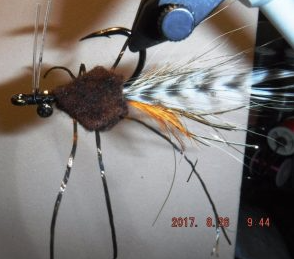
Black Toad Fly

This fly can be tied on any combination of colors.Try pink/green for an Electric Chicken Toad. Try combinations of rust and copper for traditional red fish colors. We find black works best in dark, muddy water which is common in the Marshes of Glynn. This fly will catch reds both on the mud flats and in the grass. Big reds pounce on this fly, and it will also catch trout.
Ingredients for a Black Toad Fly:
#2 hook. Mustad 34007 or equivalent
Black poly yarn
Natural buck tail
Krystal Flash
Two grizzly neck feathers
Small red or black dumbell eyes
50 lb mono for weed guard
Black 3/0 thread
Steps:
1. Wrap a thread base and attach dumbell eyes, leaving room for a small head, by using figure 8 wraps. Put a drop of superglue on the base of the eyes.
2. Wrap back to just above the barb and attach a small bunch of bucktail, about the size of two pencil leads, 1 1/2 times the length of the hook shank.
3. Attach approximately ten strands of k-flash on either side of the bucktail. Trim the k-flask to different lengths, so the longest strands are just a little longer than the bucktail tail then trim the others different lengths .
4. Attach two grizzly neck hackles on either side of the bucktail the same length as the bucktail tail, with the feathers flaring out.

5. Cut the poly yarn into ten pieces approximately 2″ long. You will be tying strands equal in thickness to 1 1/2 thicknesses of yard. Take two pieces of yarn. Separate one into two equal thicknesses. Combine one of these split pieces with a whole thickness. After combining them, starting at the tail tie in point, attach the 1 1/2 thickness strand to the top of the hook, using figure 8 wraps. Make one wrap in front of the first strand. Take a second 1 1/2 thickness strand, place it directly in front of the strand you just attached and tie it in place with figure 8 wraps. Pack the strands together. Repeat this process until you are up to the dumbell eyes, about five or six tie ins. Tie a half hitch in front of the eyes.
6. Trim the pieces so they are about the size of a quarter and taper slightly from front to back. Trim them evenly on both sides so the fly will sink and jig properly. If you prefer, you can trim them into an oval shape, about the size of a quarter.
7. Take the mono and pinch it into a V (A pair of pliers helps get a sharp V.) Turn the fly upside down in the vise. Put the V of the mono in front of the eyes. Tie in the mono at the V, and post the legs of the weed guard so they flare back toward the hook point.. Trim the mono so it is approximately 1/4 inch beyond the hook point. Tie a neat thread head and whip finish.

8. Take superglue and run a line of superglue along the hookshank/tie in points to secure everything to the hook.
9. Put a drop of superglue or head cement on the head.
10. Go fishing and hang on.
Crystal Shrimp

I have been tying with epoxy for a number of years. I had never tied with the instant cure acrylics so I recently purchased a kit of Loon Outdoors instant cure UV acrylic. This stuff is super easy to use and makes great flies.
The Crystal Shrimp is not an original recipe, but I have added a few twists. Enjoy tying, and let me know how it works for you.
Ingredients:
Size 1 Mustad 34007 or equivalent
Pink or Pearl Krystal Flash
One Grizzly hackle feather
Gray or Mono thread
Instant Cure UV Acrylic. (I used the Loon Outdoors brand. Purchase their kit with the power UV light. Loon’s product is excellent and is much less expensive per ounce than the other brands. You do have to wipe it with alcohol to remove the tack when you are finished tying.)
Instructions:
- Lay a thread base on hook. Wrap back slightly onto the hook bend.
 Take four to five strands of Krystal Flask. Fold it in half and cut. Fold in half and cut again. Tie KF along top of hook shank, extending beyond the hook bend to simulate antenna.
 - Make mono eyes from 40-50 lb mono by burning ends. Tie mono eyes on top of hook shank, directly above the barb, using figure 8 wraps. Bend the eyes up and back. Secure in this position with a dab of acrylic and cure it.

- Tie in the hackle feather. Spiral thread to just behind the hook eye. Palmer the hackle feather forward. Tie off. Cut the barbs of the feather off on the top side of the hook.

- Take about ten strands of KF, fold in half and cut. Place KF so approximately 1” extends beyond hook eye. Tie in place where you tied off the hackle feather. Whip finish. Secure with a dab of thin UV acrylic.

- Color the end of the KF with a permanent marker where it extends over the hook eye to simulate the shrimp tail. Cut off excess KF.
- Run a bead of thick Acrylic along top of hook stopping at the eyes. Spread a small amount of acrylic along the bottom, sides and top of the KF which you just tied on. On the bottom of the KF only spread the acrylic as far as the eyes. On the top of the KF, spread the acrylic approximately ½” farther than the eyes. This will form the horn. Hold acrylic soaked KF along the top of the hook shank, and cure with UV light.

- Cut off material that extends beyond the eyes at an angle to simulate the horn.
- Take the fly out of the vise and spread a thin layer of thick acrylic along the sides and top of the body of the fly to build up a natural looking shrimp body. Move the fly around to distribute the acrylic evenly along the body of the fly. When it is distributed evenly, cure with UV light.

- Repeat step 8 again if necessary.
- Trim antenna if necessary.
- Color eyes with black marker.
- Go fishing [/hidepost]
 Take four to five strands of Krystal Flask. Fold it in half and cut. Fold in half and cut again. Tie KF along top of hook shank, extending beyond the hook bend to simulate antenna.
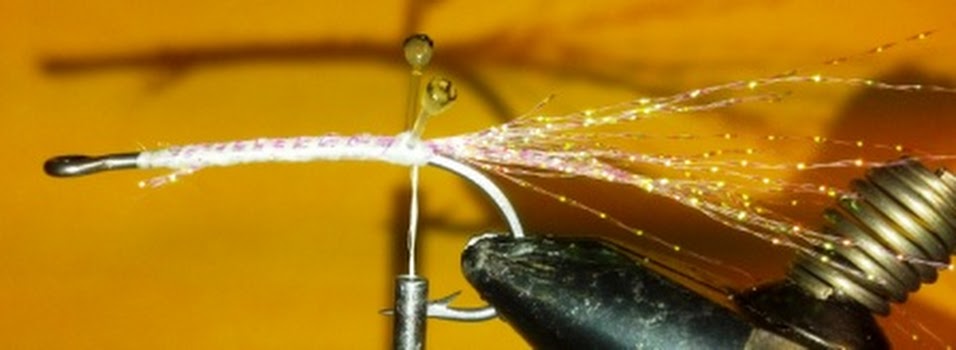

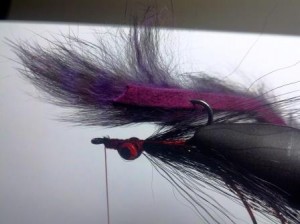
The Purple Passion
The “Purple Passion ”Capt. David Edens www.flycastcharters.com St. Simons Island, GA
The Purple Passion
This fly is an evolution of the St. Simons Scampi. While the St. Simons Scampi was developed for clear water, the Purple Passion was developed to imitate small shrimp and to be fished in stained water. This is what you find in the summer fishing low tide flats for red fish. I always like dark colored flies when the water is dingy, and purple and black are go to colors for salt water fishing. I imagine it would work well with other colored zonker strips in different water conditions and in larger sizes when the shrimp are bigger. You could also palmer the body with Copper UV polar chenille to give it additional flash, but it works well as is and is easy to tie.
Materials:
Size 4 Mustad Signature Fly Series 34007 or equivalent
Small red lead eyes
Orange barred rubber legs
Copper K-flash
Black Bucktail
Purple or Purple/Black Barred Zonker Strip
Red Tying thread—I like to use Size A rod wrapping thread for my clouser style flies.
20 lb Mason hard mono for weed guard if desired
Your content goes here. Edit or remove this text inline or in the module Content settings. You can also style every aspect of this content in the module Design settings and even apply custom CSS to this text in the module Advanced settings.
Step 1: Attach lead eyes 1/3 of the way down the hook shand, behind hook eye. Make a thread body, tie in rubber legs so they are about 3X the length of the hook shank.
Purple Passion, Eyes, flash and legs attached
Purple Passion, Eyes, flash and legs attached
Take three to four strands of K flash, fold it over the thread and tie in in front of rubber legs on either side of the hook shank. Trim unevenly so the K flash is slightly shorter than the rubber legs.

Purple Passion, Eyes, flash and legs attached
Step 2: Attach black buck tail in front of and behind the lead eyes, clouser style. Do not bind the buck tail to the hook shank beyond the initial tie in point of just behind the lead eyes. I like the buck tail to roll and flair on both sides of the hook shank.
Purple Passion with bucktail attached
Step 3: Flip the hook over. Take about a two inch zonker strip. Measure so the fibers extend just to the end of the buck tail. Pierce the zonker strip with the hook point and slide down to the fly body.
Purple Passion, piercing zonker strip
Step 4: Stretch the zonker strip along the hook shank, and tie off in front of the eye. Trim zonker strip.
Step 5: Tie in V shaped mono weed guard if desired, cement head and go fishing.
Purple Passion, zonker strip attached
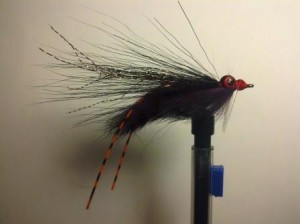
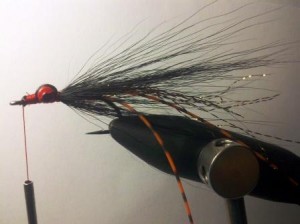
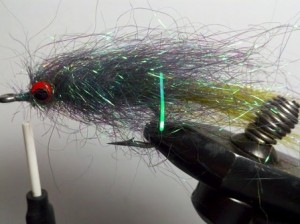
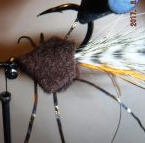
Capt. Dave’s Double Rattle Flash Crab
This is an original pattern designed for redfish in stained and muddy water. The reds simply inhale this fly. Most reds are hooked fairly deep with this fly, requiring pliers to remove it, so I recommend pinching down the barb. I am still experimenting with the fly, but it is quickly becoming the first fly I tie on.

- Side view of the DRFC


Recipe and ingredients for the Double Rattle Flash Crab.
Capt. Dave’s Double Rattle Flash Crab
“Loved by Redfish in the Golden Isles”
Ingredients:
Hook: Gamagatsu B10S, stinger hook, #2
Tail: Black Rabbit Zonker Strip, Grizzly Neck Hackle, Pearl K-flash
Body: Grand Black Ice Chenille (Note: The correct size of Grand Ice Chenille is no longer available. All of the estaz and ice chenille currently available is not large enough to form the body. I have substituted Black, Cascade Crest 1 1/4″ Holographic and Tri-lobal hackle with great success.)
Eyes: Small or X-tra small red dumbbell eyes.
Rattles: Two 3mm fly or worm rattles (small)
Sally Hansen’s Hard as Nails or Head Cement
Hot melt glue and glue gun
50 lb hard mono for weedguard
Thread: Danville, waxed black
Directions:
Tail: Clamp hook in vice, make a thread base. Measure Zonker strip so it extends 1/16” short of where the dumbbell eyes will be placed, leaving leave enough room to tie in weedguard and small head in front of eyes. The zonker tail should extend over hook bend approximately one shank length. Tie zonker strip to top of hookshank, spiral wrapping forward and then to the rear to secure it to the entire hook shank, making a base onto which the rattles will be glued. Select two grizzly hackles sized for a size 8-10 dry fly. Tie one in on each side of the hook shank so they are the length of the zonker tail and so they flare out on each side of the zonker strip. Tie in 10-12 pieces of K-flash on top of rabbit strip. Trim so a few strands extend beyond tail. Trim to uneven lengths.
Wrap thread to the front of the tied in zonker strip and attach dumbbell eyes with figure eight wraps. Wrap a few times under the eyes to tighten the eyes to the hook shank. Place a drop of head cement on the eyes to secure them to the shank.
Place a small bead of hot melt glue along one side of the hook shank, and glue rattle along hook shank. Repeat for reverse side.
Secure rattles to hook shank with wraps of thread, ending at the rear of the fly, just behind rattles and in front of the tail.
Tie in Grand Ice Chenille and advance thread to just behind the lead eyes. Liberally coat rattles top, bottom and sides with head cement or Hard as Nails.
Wrap Ice Chenille tightly up the fly, sweeping the fibers back so they don’t get trapped under subsequent wraps of chenille. (You might have to make a few wraps to ramp up the rattles.) Wrap up to just behind the dumbbell eyes and tie off. Wrap thread in front of eyes and tie off with a whip finish or half hitch. Do not cut thread.
Pull fibers out to the side, flattening the body of fly. Run a bead of Hard as Nails or head cement on the top and bottom of the hook shank, down the middle of the Chenille. Pull the fibers out, working the Hard as Nails or cement into the fibers to thoroughly flatten the fly. Trim sides of fly fibers to approximately the shape and size of a quarter. Trim top and bottom of the fly to completely flatten the fly.
Turn hook upside down in vise. Cut a short piece of 50 lb Hard Mono for a weed guard and bend it into a V. Tie the weed guard in with figure 8 wraps, posting the two legs as necessary to hold them in position.
Cement head, trim weed guard and go fishing.
The No Name Fly
The No Name Fly
I am constantly trying to come up with easy to tie flies that give the reds something new to look at. The inspiration for this fly is the Estaz Marabou and the tried and true Wolly Bugger. I utilize some new and some traditional materials in this fly. It is quick and easy to tie.
I don’t have a name for it, so I am calling it the “No Name Fly” for now.
For a weed guard, I like the traditional V shaped weed guard made with 20 lb. Mason’s Hard Mono. Please look at the Tips and Techniques Page for a great tip on preparing mono for a weed guard.
Here is the recipe for the no name fly:
Recipe:
No Name, Step 1
Red lead, bead chain or mono eyes 1. Attach lead eyes. Attach a mono loop at the beginning of the hook bend to keep the tail from fouling around the hook.
No Name, Step 2
2. Cut and clean a large pencil sized bunch of craft fur. Attach above the mono loop so it is approximately two hook shanks long. Attach four strands of k-flash along each side of the tail. No Name, Step 3 3. Attach the sparkle brush at the base of the tail, and palmer forward, sweeping the sparkle brush
The No Name Fly
4. Attach a weed guard if desired, wrap a small head, and whip finish and cement. |
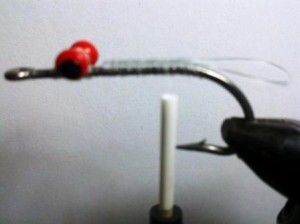
New Shrimp Pattern; the “Prawn’s Revenge”
The “Prawn’s Revenge”

The “Prawn’s Revenge”
This fly is a variation of the Simran bonefish fly. In the Fall and Early Summer the shrimp in the creeks and on the flats are small. This fly is designed to imitate them. Tied on a size four hook with light eyes, it is easy to cast but sinks quickly. The EP fibers and rabbit strip wave enticeingly in the water even without movement. It has enough flash to attract the reds and trout in slightly stained water. I had a red attack this fly so savagely that he gave me rope burn on my line finger. I haven’t tried it in black yet, but that should work in murky water. It is easy to tie and extremely effective.
Ingredients:
Size 4 Mustad 34007, Tiemco 811S or equivalent
Small or Extra small lead eyes
White 3/0 thread
Pearl Krystal Flash
Tan Polar Chenille
Tan Rabbit Zonker Strip
Rust Brown EP 3D fibers
Head Cement or Hard as Nails
If you use this fly in heavily stained or muddy water, substitute rust/black dyed barred zonker strip for the tan zonker strip. Use copper UV Polar Chenille and use just a few strands of K-flash for an over wing.
1. Place hook in vise, lay down a thread base, and tie in eyes; clouser style.
“Prawn’s Revenge” w/ eyes, k-flash and Polar Chenille attached
2. Wind thread back, slightly down the hook bend. Attach Polar Chenuille and ten to fifteen strands of Krystal flash. Leave about 1/2 hook shank length of K-flash sticking out beyond the hook bend to form a tail.
3. Wrap remaining K-flash around thread. Coat the thread body with head cement. Wrap forward, forming a body. Figure 8 wrap the K-flash around the eyes and tie off in front
of the eyes.

4. Palmer the Polar chenille up the hook shank, over the K-flash body. Make sure you sweep the fibers back with each wrap so the succeeding wrap does not trap the flash beneath it. End right behind the eyes with two wraps and tie off. Make a two wrap whip finish or place two half hitches in thread in front of the eyes.
5. Remove the hook, and turn it over in the vise, hook point up. (Or rotate it if you have a rotating vise.)
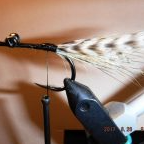
“Prawn’s Revenge” with zonker strip attached, ready for EP fibers
Take a 2″ piece of tan zonker strip. Measure so the tail extends a hook shank length beyond the bend. Carefully pierce the zonker strip with the hook point and slide it down to where the body ends. Take the front of the zonker strip, stretch it over the hook shank, and tie off in front of the eyes.
6. Take a sparse amount of brown EP fibers, stagger the ends, and tie in on top of tied off zonker strip.
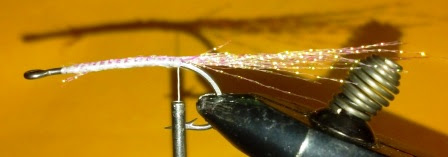
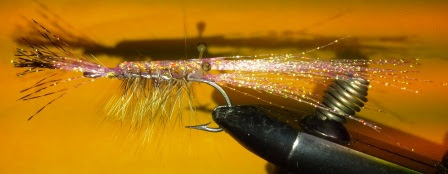
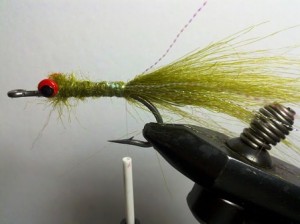
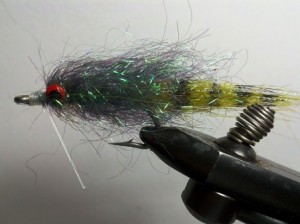
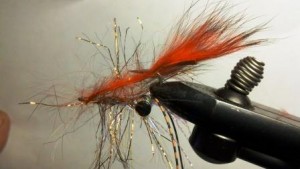
St. Simons Scampi Red Fish Fly
The St. Simons Scampi
This is a great, new red fish fly that builds upon the success of the Prawn’s Revenge. Tie it with 3mm bead chain eyes for a light, easy casting fly for shallow water or lead eyes for fishing in deeper water. Like the Prawn’s Revenge, the combination of barred rabbit fur, polar chenille and krystal flash provides motion even when the fly isn’t moving. The fly rides hook point up, so it is relatively snag free.
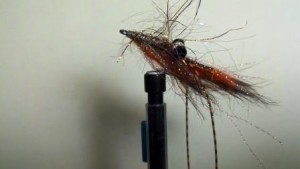
Completed St. Simons Scampi
Ingredients:
Size 4 Tiemco 811S, Mustad 34007 or equivalent
Spirit River Tarantula Legs, Orange, Medium
Brown, Rust Brown or Danville’s Fine Monofilament thread
Wapsi Presentation Lead Eyes, Small or X-small, Black (For a lighter, easier casting fly that works just as well in shallow water, use 3mm brass bead chain eyes.)
Krystal Flash
Hareline UV Polar Chenille UV Copper
Black and orange bar Dyed Zonker strip.
- Lay down a thread base. Attach lead eyes partially down the hook bend with figure 8 wraps.

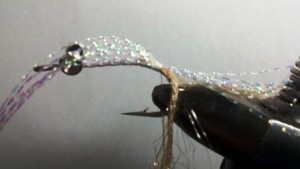
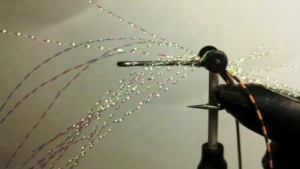
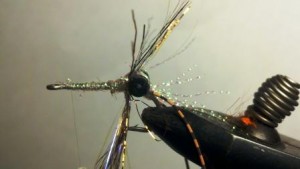
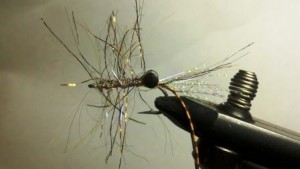
St. Simons Scampi, Eyes, antennae and k-flash attached
- Attach one Tarantula leg in front of the eye by folding it in half around the thread.
- Bring the legs to the rear of the eye, and secure on either side of the hook with a few thread wraps.
- Attach approximately 15 strands of K-flash behind the eye with strands extending one hook shank length behind the eyes, forming a tail. Secure with thread behind the eyes. Pull K-flash over the eyes and secure with three wraps. Attach Polar Chenille directly in front of the K-flash.
Body formed, chenille ready to wrap
Wrap thread counter clockwise around the K-flash. Wrap away from you to form the body. (The thread will continue wrapping around the K-flash) Figure 8 wrap around the lead eyes. Wrap forward to form the body, keeping the thread wrapped around the K-flash. Stop short of the hook eye and tie off. Palmer Polar Chenile forward, sweeping the fibers back so they won’t be tied down with the subsequent wraps.
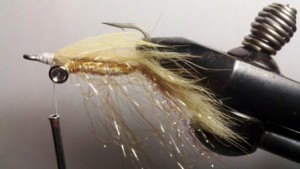
Body completely formed. Ready for the zonker strip
Four or five wraps are all that are necessary. Tie off and secure with half hitches or whip finish
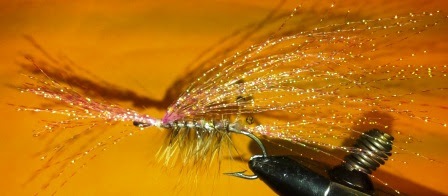
- Turn the fly over in the vise, or if you have a rotating vise, rotate so hook point is up. Cut
Attaching the zonker strip
off a 2” long piece of zonker strip. Size the tail so the fiber length of the rabbit fur extends a hook shank length beyond the eyes. Carefully pierce the leather of the zonker strip with the hook point and slide the zonker strip down on the hook bend, against the body. To control the rabbit fibers, wet your fingertips and moisten the zonker strip. Pull the zonker strip tight toward the hook eye, and tie off.
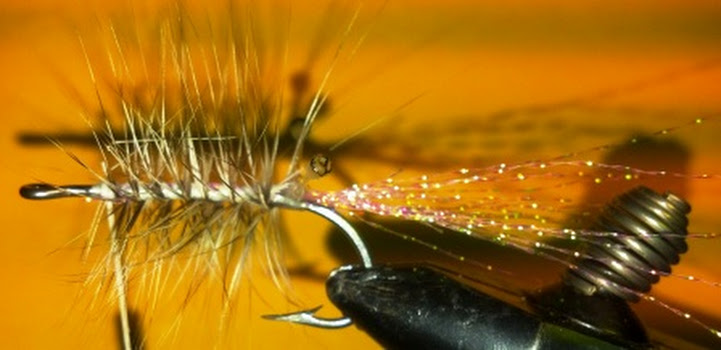
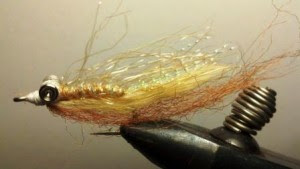
Completed St. Simons Scampi
Note: Depending upon how full the zonker strip is, you might have to split the strip with a double edge razor blade. You don’t want the rabbit fibers to overwhelm the fly.
- Attach a V style mono weed guard if desired.
- Wrap a neat thread head. Apply head cement or Sally Hansen’s hard as nails and go fishing.
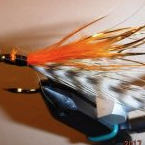
Estaz Marabou
This recipe is courtesy of John Bottko of Jacksonville, FL. It catches both reds and trout. Add some dumbell eyes if you need more weight.
Estaz Marabou
Materials:
Hook: Mustad 34007 or equivalent size 2
Lead wire: 015
Marabou feathers: White and Chartreuse
Estaz or Cactus Chenille: Chartreuse
Krystal Flash: Chartreuse
Thread: Flat waxed nylon Red
Head cement
Steps:
Clamp the hook in the vice and attach the thread just behind the eye of the hook and lay down a base all the way to the bend of the hook. Begin wrapping the hook shank with lead wire just above the hook point and wrapping forward to ¼ of an inch behind the eye.
Choose two Marabou feathers from the bunch. Try to find two that are close to the same size. You will attach one feather on each side of the hook. You want to attach the Marabou so they are married together. The tail should be about 1-1/2 times the length of the hook. I tie them in towards the front of the hook shank which adds volume to the body of the fly.
Cut 8 to 10 strands of Krystal Flash. You can tie this in several different ways. I like to wrap the Krystal Flash around the tying thread and slowly pull it down and tie it in place on top of the hook shank.
Choose another Marabou feather of either the same color or a contrasting color. This feather will be attached on top of the Krystal Flash you just tied in.
Strip the fibers off the end of your Estaz and tie it in and advance the tying thread to the front of the hook.
Using head cement or super glue saturate everything on the hook shank.
Begin wrapping the Estaz over the wet cement forward. Using your free hand brush the fibers back with each wrap. Continue wrapping forward to the front of the hook leaving enough room to form a cone shaped head with the tying thread.
Whip finish, add a drop of head cement and go fishing.
Chartreuse Chernobyl Flash Bang

Chartreuse Chernobyl Flash Bang Fly
Chartreuse Chernobyl Flash Bang: This is a really simple fly to tie. It is nothing more than a variation of a wolly bugger, tied with a rabbit strip and Puglisi Sparkle Brush. I have been fishing it a lot lately with great success. Try tying it with a Speckled Gold Puglisi Sparkle Brush and rusty orange rabbit strip. Add some gold flashabou, and you have a fly that flashes like a spoon, but is far easier to cast.
Here is the recipe. Enjoy, and send me a photo of a fish you caught on it.
Mustad 34007, Tiemco 800S or equivalent, size 2 to 1/0 (I like the 1/0 Gamakatsu SL12S as well. It has the same shank length as the size 2 34007, larger hook gap and is stronger.)
Large bead chain eyes or lead eyes
Black Standard Estaz
Chartreuse Puglisi Sparkle brush
Chartreuse zonker strip
30 lb test mono for foul guard
20 lb test hard mono for weed guard if desited
- Tie eyes in just behind hook eye. Leave room for a small head and/or weedguard.
- Tie in foul guard loop at hook bend.
At the hook bend:
- Tie in Zonker strip (two times shank length)
- Tie in estaz.
- Tie in flash brush.
- Wrap Estaz forward for a body. Figure eight wrap around eyes to form a head. Tie off in front of eyes.
- Palmer sparkle brush forward. Stroke fibers back while wrapping around shank.
- Tie off sparkle brush just behind eyes
- Tie in V shaped weed guard if desired.
- Shape head and seal with head cement, super glue or whatever you use.
- Bar body and tail with Sharpie
Tease the Chartreuse Chernobyl Flash Bang in front of a fish and he will inhale it!!

14 lb red fish caught on a Chartreuse Chernobyl Flash Bang
Big, shaggy new Red Fish Fly The Mop. Catching Red Fish in Muddy Water
New Red Fish Fly, The Mop

Wind. It is the curse of fly fishers everywhere. It is even more of a curse when fishing for shallow water red fish on mud flats. The wind stirs up the water and makes it muddy. This is where the new red fish fly, The Mop, shines.
One of the biggest challenges we have is getting the fly where the fish can see it. That challenge is ever greater when the water is stained or muddy. This new red fish fly, The Mop, was designed for this challenge.
I have been trying to figure out how to tie a fly that pushes water, has the right colors for stained water, is big and flashy enough for the red fish to see it.
Dark colors and contrast work the best in stained waters. I designed this new red fish fly, “The Mop” to meet these criteria.
The “Mop” is tied on a regular shank 2/0 hook with medium dumbell eyes, black zonker strip, chartreuse marabou plume, purple Puglisi fibers and lots of gold Flashabou.
Tying it is simple. Tie in the eyes. Tie in a foul loop, then tie in a Black zonker strip for a tail.

In front of the tail, palmer a chartreuse
marabou feather. On either side, tie in a few strands of gold flashabou.

For the head, make a dubbing loop about 6″ long. Take purple Puglisi fibers. Cut some in half and some in thirds. Place them along the loop. Dubbing wax helps hold the fibers in place.

Palmer them to the back of the eyes. Pick out the trapped fibers as you are wrapping the loop. Tie off, pick out the rest of trapped fibers.

Then tie in about 12 strands of gold Flashabou on either side. Tie in a weed guard if desired. Whip finish and cement the head. This new red fish fly, “The Mop” is about 6″ long when finished.
The “Mop” is big, flashy, has movement, contrast, and has been catching fish in dirty water.
A fly this big needs to be thrown by a heavier fly rod. Pull out the 9, or even the 10 weight. It will make tossing this new red fish fly, “The Mop” much more enjoyable.
I always say, “To eat it they gotta’ see it” This fly will be seen.
Red Fish Rattle Shrimp

Red Fish Epoxy Rattle Shrimp
My good friend Kyle Burrell-a full-time trout guide on the Chattahoochee and in Wyoming-introduced me to this proven pattern for reds on mud or grass flats. It is also an excellent prospecting fly around oyster rakes and will catch flounder and trout. When you tie it, plan on tying four to six of them in order to utilize the epoxy. This is not an original pattern, although I am sure I have made some modifications to the original recipe. It is great in muddy, stained water.
Ingredients:
#2 Long Shank Hook
Gold Mylar tubing
Medium Glass Rattle
Small Red lead Eyes
Gold Body Braid
Gold Flashabou
Tan Bucktail
Rust Bucktail
Mono thread
Red Size A rod wrapping thread
Five or ten minute expoy.
50 lb mono for weed guard
Superglue
For a black Rattle Shrimp that is great in really dirty water, use black mylar tubing, Black Flashabou with chartreuse bucktail underwing (or marabou) and black bucktail overwing.
Steps:
With mono thread, start ½ way down hook shank and lay down thread

base.Tie in eyes on top of the hook, just in front of the hook bend
Tie in mylar tubing behind lead eyes, with a hook shank length of tubing extending beyond the hook bend. Do not un-ravel the body braid until the epoxy has set.Tie in body braid, wrap mono thread forward ¾ way up the hook shank.
Wrap body braid up to thread. Tie off.
Insert rattle into mylar tubing. Pull the tubing over the eyes, placing the rattle as far to the rear as possible. Keeping mylar tubing on top of hook shank, tie off with mono thread and whip finish.
Apply epoxy liberally over the body, tubing and eyes, completely covering the body. Rotate until epoxy is set.
Put epoxy coated body into vise, hook point up. Tie in red thread in front of the epoxy coated body.
Take a small bunch of tan bucktail, about three pencil leads in diameter, and tie in on the bottom of hook shank. The bucktail should extend about a hook shank length beyond the hook bend. Put a dab of superglue on tie in point. Take about ten strands of flashabou, double them, and tie in on top of tan bucktail. Put a dab of superglue at tie in point. Trim the flashabou to different lengths, with the longest strands extending just beyond the bucktail.
Take a small bunch of rust bucktail, and tie in on top of flashabou. Put a small dab of superglue at tie in point.
Whip finish
Un-ravel the mylar tubing tail.
Make a V out of a short piece of 50 lb mono and bring it up onto the hook shank. Figure 8 wrap it into place. Post the two pieces of mono to hold them in place.
Whip finish and coat head with superglue or head cement.Go fishing and hang on.
Felt Crab
 Felt crab flies have been around for a long time. I have always fished toad style flies, particularly the black toad for tailing red fish. Earlier this summer, a client showed me a crab fly he tied. We tied the fly onto the leader and he proceeded to catch 3 fish on the flood.
What impresses me about this fly is how gently it lands. I have seen this fly thrown inches from a fish, and the fish did not spook.
It is a great imitation of a fiddler crab. My client’s original pattern included crab eyes. I include them sometimes and other times not. I don’t think it makes a difference for red fish.
Here is the recipe:
- Brown or black felt sheets from craft store
- 1/0 short shank hook. This is an Owner AKI bait hook.
- Small lead eyes
- Tail material. I used red fox tail, but use what you have.
- Grizzly hackle for claws.
- Orange maribou
- Flash-whatever you like
- Super glue-or you can use hot melt.
- Rubber legs
- Mono for weed guard
Establish a good thread base. Tie in lead eyes, tail and claws.
Tie in flash and egg sack.

Cut two pieces of felt to the correct size and shape
 Invert the fly. Using a drop or two of super glue, attach
the top of the fly to the thread base,
and place rubber legs on the fly.
 Place a few drops of super glue on the piece of felt. Carefully place and align the second piece of felt on the fly. Arrange the placement of the rubber legs. Squeeze the top and bottom pieces of felt together.
Tie in mono weed guard, whip finish, color the felt with a sharpie if you like. Then go throw it at some tailing red fish.
Black Toad
Prawns Revenge

Double Rattle Flash Crab

Felt Crab Fly

Redfish Rattle Shrimp

No Name Fly

St Simons Scampi